Revision. The art of reviewing information.
A Levels are tough - there’s no doubt about it. But I found that streamlining my revision workflow reduced my stress, by focussing on revision techniques that gave me the most benefit.
I am by no means an expert, but I do think that I have some insights that I can share to help you discover your most efficient revision workflow.
So, without further ado, here’s how I revised for my A Level Exams.
Legacy methods
For many years, I found that I had been using the same study techniques: reading textbooks, making notes, re-reading notes, drawing massive mind maps, and making huge flashcards with ridiculous amounts of facts on them - all while somehow hoping this information would sink in.
This technique seemed to have fared me quite well over the years, given I achieved what I hoped for using these ‘inefficient’ methods. Indeed, I wasn’t exactly cramming, in its usual sense, since I largely avoided long sessions intensively reviewing content. But, I feel, that in retrospect, I was undertaking what I like to call long-term cramming: where I used the same basic passive techniques of revision that I saw many of my peers using, just over a longer-term basis.
But, when I hit the workload of A2 revision - with higher stakes (where my firm university offer hinged on me meeting its conditions) - these legacy methods just didn’t cut it for me.
I needed a new system. A new way of revising.
An active system.
Introducing Active Revision
For me, active revision holds one concept at its core: engagement.
Engaged Revision is where I work with the content in a way that requires thought - so rather than just inputting information, I have also to understand and recall the information: outputting information.
This works in 3 key ways. First, I had to understand the content, to provide a framework of the subject for my revision. I then _remember_this understanding - such that it isn’t lost after a period of a few weeks - through active recall and spaced repetition. My final step was _applying_this revision, to make it useful, relevant and accessible for the exams - pulling together understanding and remembering to drive my results.

So, to explore how I’ve weaved these techniques throughout my revision, I’ve spliced this blog post’s exploration of my revision process into 3 core strands:
- Understanding: the long-term foundations
- Remembering: the facilitator
- Applying: the ‘top’ of the pyramid
Understanding
Understanding the concepts used in my studies proved to be fundamental in building up my pyramid of exam preparation. This is critical at A Level, because it provides not only the framework in which facts rest, but also facilitates the connections needed for the critical analysis of debates.
I saw this to be composed of 2 key elements: the content itself, and the connections between different snippets of content.

Content: the foundations
My preferred method for understanding content was making revision notes. Ideally I would make these notes a few weeks (or, more realistically, months) after I encountered new concepts. Although making notes is technically a passive style of revision, I found it invaluable in improving my understanding of content.
For me, the objective of making revision notes is three pronged:
- To provide a structure in which to organise facts
- To facilitate the creation of flashcards, by acting as a reference resource
- To ensure a complete understanding of concepts, by forcing me to explain them in simple terms
How I make revision notes
Generally, I make revision notes by hand. I find that this forces brevity (as I take longer to handwrite than type), which helps to ensure each point I write down is relevant. Furthermore, I enjoy the flexibility of handwritten notes - as diagrams, tables and illustrations are much easier to integrate into my notes at a pinch. My close friends will also know that I like to make my revision notes beautiful, which I find motivates me to sit down and revise, something that I also find easier to do by hand.
Let’s start with where I get my information. When making notes, I use a variety of sources (including textbooks, class notes and online material) where they were most detailed and best suited to my focus areas. This is because some textbooks and websites often give better coverage to certain parts of the course than others.
Based on this information, and my own understanding, I began to systematically create concise notes covering the entire syllabus point-by-point. Although this attempt to be complete in my notetaking may be deemed excessive by some, I did this to be certain that my later attempts at memorisation and application acted on strong foundations.
Throughout creating my notes, I endeavoured to:
- Refer to the syllabus throughout the writing process to ensure my revision notes adequately targeted the demands of the specification
- Be systematic in my approach to ensure that each section of the syllabus was covered
- Break my notes down into concise chunks that could be easily transcribed onto flashcards at a later date
- Be visual in my note-taking to make key concepts stand out
- Use tables and flow-diagrams to ensure that I engaged with the content as I reviewed it, to ensure that my understanding was concrete
Once armed with this base understanding of the topic, I could begin to build connections between different ideas. I used this to strengthen my understanding.
Connections: integrating components
Flows are my mainstay for forming links between concepts in my revision. I found this to be especially helpful because of the strong focus on synthesis and evaluation in the humanities subjects I took at A Level (Geography and History).
Introducing flows
A flow is my personal blend of mind maps and flowcharts.
Each flow has 3 key features:
- Key information: the information presented in a flow is minimal - providing a gateway to the recollection of key ideas, and to information stored in revision notes
- Links: these connect different elements of key information in a clear visual way (using lines and arrows)
- Clarity: that the flow connects concepts, by making their links clear, rather than explaining them and confusing the picture (explanation is what revision notes are for). I find small illustrations are useful to show key information, since they don’t obscure the connections drawn on the page too much
It is easiest to put this (pretty vague) theory into context through an example.

The easiest way to describe a flow is as a method of connecting related pieces of information in a very visual way, as explained above.
Firstly, it is clear that the example flow above includes minimal, and only key, information, making the page very clear and uncluttered, with the pieces of information included being very concise. The snippets of information involved also act as useful starting points for creating flashcards - with each side of the connecting line forming one half of the flashcard. For instance, a sample card could have a front of “Why was Britain not afraid to push its Opium upon China to the point of Conflict?”, with the answer “Because it was the world’s largest naval power at the time”. This made flows a very powerful tool for me, since it makes the flashcard generation process for synthesised information much easier.
Secondly, even with a quick glance at the page, the links are very clear between different pieces of information. I found such a clear visual representation of how different bits of information were related helped to make the recalling of flashcard information easier and more rapid, as I could visualise the flow diagram during my flashcard reviews.
And lastly, clarity. As I mentioned earlier in this example, the information is very clearly laid out to the reader, through the use of colour and spacing, and the focus on connecting rather than explaining information.
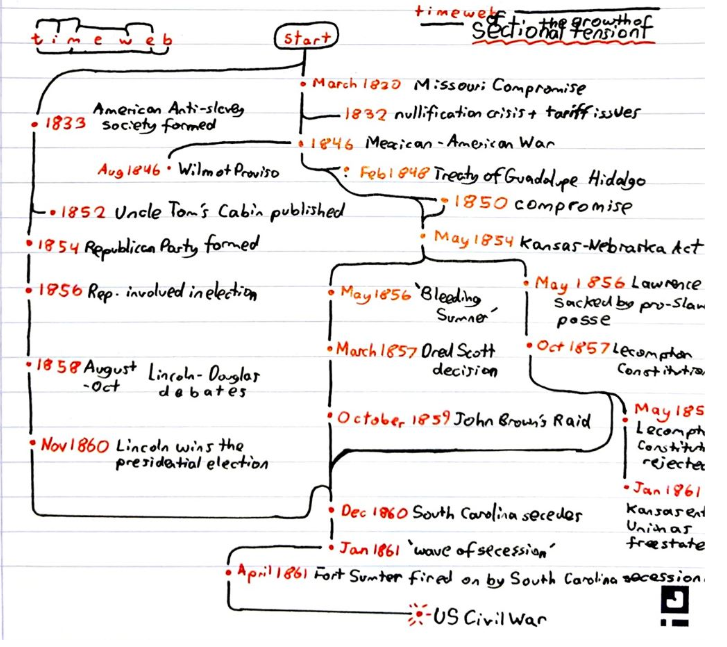
I also found flows to be a useful summary tool when incorporated into my revision notes, especially in History. In this context, they helped me summarise the connections between a series of events. For instance, in my unit “USA in the 19th Century”, I used Timewebs after I finished each section of revision notes to summarise the theme’s main events and the links between them.
Here’s an example from the Sectional Tension section, to help bring this theory to life.
Remembering
Here’s a feeling that we can probably all draw upon. You study content thoroughly - using deep learning techniques - for a few days, and you feel completely on top of it. However, a few weeks later, when you try to recall this understanding, it just doesn’t feel as clear as it did when you first revised it. This is where active recall and spaced repetition come in to play, to help you access your understanding.
Active recall
Active recall is where you engage your memory while revising. This helps to consolidate concepts and details into long-term memory through the testing effect.
If you’re interested into understanding why active recall is so effective, I recommend checking out this Wikipedia article and its references as a starting point.
I applied this concept to my revision through using a series of small, testable flashcards. The benefits of flashcards, as a method of active recall, are that they’re easy to make, intuitive to use and encourage the summarisation of information.
But how do you make an effective flashcard, so you can remember more of what you’ve revised?
Effective flashcards: The 3S Rule
I found that my most effective cards were simple, specific and structured.
- Simple: streamlining what you choose to remember in one go by trying not to fit too much on a single card. I find this is easiest to achieve by writing in a large font, so you are forced to write less on the card.
- Specific means 1 precise fact per card. This means that the information on the card can be more readily reviewed - as there is one component to learn per card. Not only does this make the review sessions easier, since you can really narrow down what you do and don’t know, but it also reduces the risk of falling into the recognition trap (where you think that you know something, while in reality you are just recognising it).
- Structured means that you make cards that link different concepts together - to ensure that the flashcard system not only helps you remember information, but also the connections between different bits of knowledge.
To bring these ideas to life, here’s an example. Let’s imagine we are trying to memorise facts about the Louisiana Purchase: a parcel of land purchased by the United States from France in 1803.
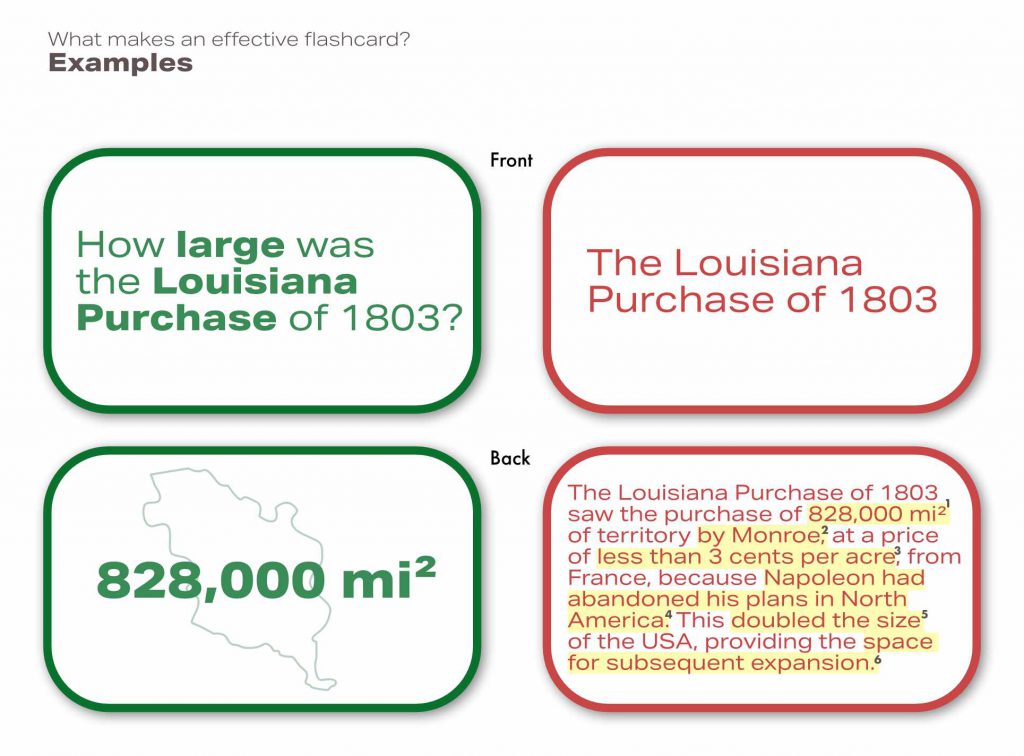
Let’s start with the front of the cards. The good flashcard (on the left) is specific in its demands: focussing on how large the Louisiana Purchase was. However, the bad flashcard (on the right) is vague in its demands - such that if you were presented with this flashcard in a review session, you could not be certain (in the long-term) what information needed to be recalled to get the card correct. So, it is clear that the good flashcard is specific in this case, as it demands just one fact to be recalled: the area of the Louisiana Purchase.
When we move onto the back of the cards, the differences between the ‘good’ and ‘bad’ flashcards become even clearer. To start with, it should be clear that the good flashcard (on the left) is simple (and hence, effective), because it demands the recall of just 1 fact to be marked correct: the precise size of the Louisiana Purchase.
Meanwhile, the bad flashcard (on the right) is complex, containing 6 facts in total. It is unlikely that you will be able to accurately recall all 6 of these facts, or even know you needed to recall 6 facts, in a review session, especially after a long interval of several weeks.
So, the ‘bad’ flashcard should be split up into 6 separate cards to address each of the points it is trying to engage with. This makes the knowledge held on the card less liable to the recognition trap, and ensures it can more readily be sorted during review.
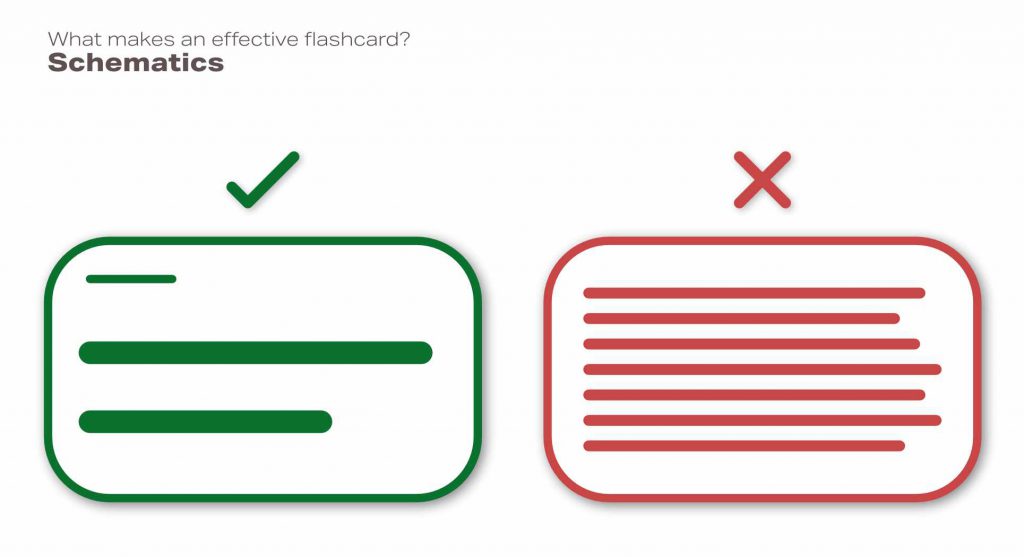
Another element to note is the presentation difference between these ‘good’ and ‘bad’ flashcards. The answer side of the good flashcard is visually striking, meaning that the answer can easily be checked, but which also helps to provide a visual anchor for when you review the card. Meanwhile, the bad card is written as a block of prose, making it hard to determine if you got the card right or wrong.
But wait, you might be wondering what happened to the structured component of effective flashcards. This is best illustrated by considering a web of flashcards (which is a memorisation framework built on the principles established by my flow method of understanding). Linking cards work to help connect different information flashcards (as described above) to help give structure to the information you are learning. The example below helps to make this a bit clearer.
![]()
There are 2 types of linking cards here, which I call overview and connecting flashcards.
- Overview flashcards (like “2 key secondary hazards from volcanic eruptions”) are designed to group together multiple information cards (e.g. “what are lahars?") on a similar theme (here, secondary hazards of volcanic eruptions)
- Connecting flashcards (e.g. “Secondary hazard resulting from pyroclastic flows”) work to build and maintain a mental association between 2 information cards (here pyroclastic flows and lahars)
This structuring of my flashcards, using linking cards to join together different facts, is a really powerful tool for me, as it helped to organise and connect discrete pieces of information in my memory. This was especially helpful when it came to my exams, as it allowed me to jump between different concepts with ease, as I learnt facts alongside an awareness of how they relate to each other.
But how do we actually work to remember these cards, now that we’ve created them? This is where spaced repetition comes into play.
Introducing spaced repetition
I used spaced repetition with these flashcards in order to interrupt the forgetting curve.
The Forgetting Curve
When we first learn something, it is stored in short-term memory. The effect which I described at the start of this section, where the content becomes fuzzy a few days after learning it, is part of the decay process explained by the forgetting curve.
The forgetting curve is a model that attempts to explain how information is lost over time, when there is an insufficient attempt to retain the given information through active recall.
However, by interrupting this process of forgetting, we can strengthen the durability of our revised knowledge, such that it is ready for application in the exam hall. We do this through spaced repetition.
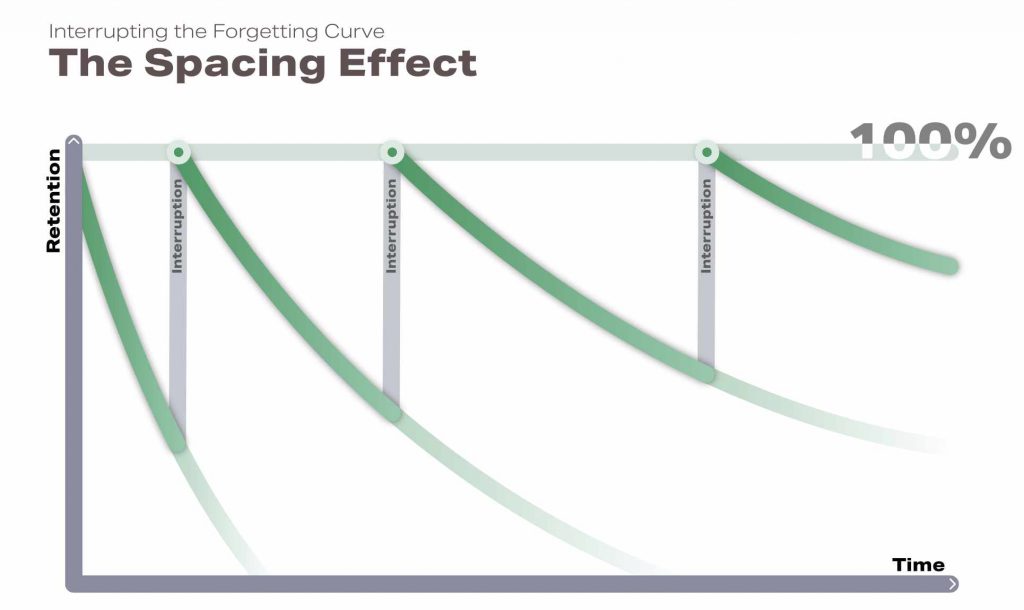
Spaced repetition is where we use increasing intervals of timebetween interruptions of the forgetting curve. We interrupt the process of forgetting by using active recall techniques, which work to resurface previously learnt information. This results in a spacing effect, where the rate of retention of a fact gradually increases over time. This is indicated by the gradual shallowing of the forgetting curve above. This, in the context of revising for A Levels, enables you to remember huge amounts of information.
Sounds good? This is how we implement it.
Flashcard review
Based on these principles, I built an analogue flashcard review system, modelled on the Leitner box method, in order to apply spaced repetition to my revision - so I could recall the specific facts for use in my exams, such as the size of the Louisiana Purchase in 1803. Thomas Frank uses a similar method in his video “The Most Powerful Way to Remember What You Study”, which was an inspiration for me to dig deeper into effective study techniques.
To implement this system I created a series of flashcard decks, held together using Field Notes Bands of Rubber. The higher the order of the deck of cards, the better I knew the information on them, and the larger the intervals at which they were reviewed (because of the gradual flattening of the forgetting curve by spaced repetition). These decks are quickly outlined below.
The 6 Decks
- Deck 1: Reviewed on a daily basis
- Deck 2: [A/B] Reviewed every other day (Deck 2A and 2B are reviewed on alternating days)
- Deck 3: [A/B] Reviewed at a weekly interval (Deck 3A is reviewed at weekends, and Deck 3B is reviewed mid-week. When a card progresses from Deck 2, you select the Deck 3 that is being reviewed the furthest in the future)
- Deck 4: [A/B] Reviewed at fortnightly intervals (Deck 4A and 4B are reviewed on alternating weeks, such that a card entering the pile from Deck 3 is reviewed between 1.5 and 2 weeks after entering Deck 4)
- Deck 5: [A/B/C/D] Reviewed at 4-week intervals (Deck 5A, 5B, 5C and 5D are reviewed on subsequent weeks, such that a card entering the pile from Deck 4 is reviewed exactly 4 weeks after entering Deck 5)
- Deck 6: [A/B/C/D/E/F/G/H] Reviewed at 8-week intervals (Deck 6A, 6B, 6C, 6D, 6E, 6F, 6G and 6H are reviewed on subsequent weeks, such that a card entering the pile from Deck 5 is reviewed exactly 8 weeks after entering Deck 6)
NB: Subsequent decks can be formed if you begin your flashcard review system over 16 weeks before your exams begin. Just double the interval, and number of alternate lettered decks, for each subsequent pile.
I recommend using the intervals I listed above to mark which flashcard decks need to be reviewed each day on a calendar, so you don’t have to figure out which flashcards you need to look at every day!
Phew, that was a lot of decks. But how do we actually go about using them?
All the reviews
How do we review all of these flashcards? Let me explain.
Firstly, every time you make a new flashcard, pop it into Deck 1 so you can review it in your next study session.
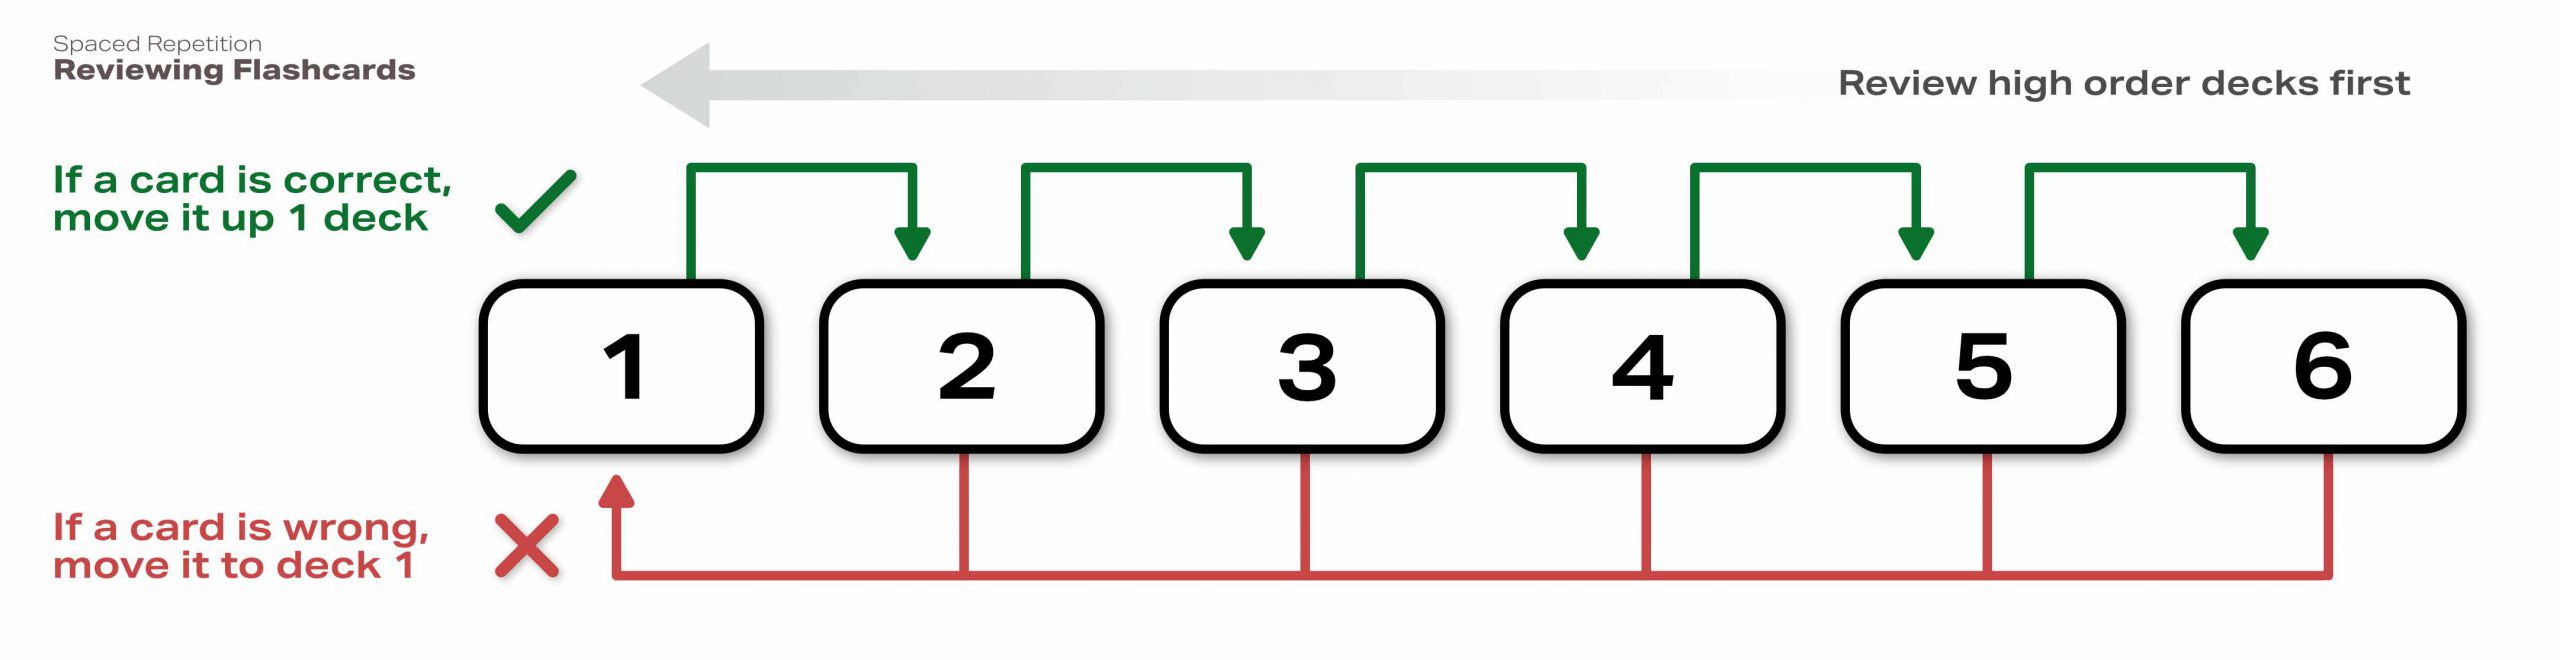
When you sit down to review your flashcards, I recommend starting with the highest number deck first, and working your way down towards Deck 1. For example, one week you could revise Deck 4A, 3A, 2B and then finally Deck 1. This helps to keep your motivation up, as you tend to be able to recall cards in higher-order decks more easily. It also avoids confusion when you move cards up 1 deck during reviewal.
When you get a card correct, it moves up into the next deck. And when you get one wrong, it moves all the way back to Deck 1. This process is visualised in the diagram above.
I suggest putting incorrect cards in a small staging pile, before incorporating them into Deck 1, so you don’t end up accidently upgrading them to Deck 2 with other cards in Deck 1. And, when you get a card wrong in Deck 1, I suggest moving it further down in the same pile, and keep reviewing it until you get it right - before moving it into the staging deck, ready to be incorporated into the following day’s Deck 1.
This enables forgetting to act as a sidekick to learning, as the process of forgetting helps you to sort (because the flashcards being reviewed are simple and specific) between cards that you do know, and cards that you know less well. This allows you to target your revisionto strengthen areas that don’t confidently know, rather than wasting your time over-tending to concepts you do know.
The process of reviewing flashcards is potentially the hardest part of this revision process, but it is definitely worth it. I found it easier to engage in my flashcard reviews when I had a habit of reviewing them as my first revision activity in the day. Because spaced repetition yields such strong long-term benefits, it is ideal to start reviews as soon as possible before your exam. On an anecdotal side-note, I found it substantially easier to learn new cards if I added them into the system within 48 hours after making them.
A note about Anki
It is much easier, and more flexible, to use a digital flashcard system. This prevents reviews from piling up on one day, as they tend to do with the analogue method, since each digital card can be individually tracked. Furthermore, this ensures that cards can be given a precise review spacing, depending on how difficult you found it to recall them, which is pretty impractical to do with an analogue system.
I recently began experimenting with Anki, as a digital flashcard system, and have been pleased with the results so far. Hopefully I’ll eventually write a blog post that dives into more detail about my new digital system of flashcard reviews, but for now, I suggest looking at this guide, or performing a quick google search, to get started with using Anki, and take advantage of the portability and convenience of digital flashcards.
And, for a deep dive into why this method of using flashcards is so effective, I strongly recommend Grewn’s excellent article on spaced repetition.
Applying
This stage of revision was perhaps the most important for me, and maybe the one you are most familiar with!
It’s pretty simple to explain:
- First, pull up a list of past papers for the exam(s) you are studying for
- Download a selection of papers from different years (especially recent years if the question format has changed due to the recent revision of exam specifications)
- Sit each paper as a mock exam in timed exam conditions
- After sitting the paper, mark it. I suggest going through your script and adding comments of how you could improve based on the mark scheme
- Track your progress in a table or spreadsheet to examine how your performance in exam conditions is changing
Step 4, where you use the mark scheme to analyse your response to the exam paper, was perhaps the most useful for me. I strongly suggest pulling apart the mark scheme, and examiner reports, to understand the qualities and responses examiners look to see in a ‘good’ candidate. This helps you target your response for the exam, and develop your writing style, to help you demonstrate the skills and knowledge expected from a good candidate.
Final Thoughts
Firstly, congratulations on making it through to the end of such a long blog post! I hope that you find some of the methods and rationales included in this post useful in helping you to streamline your revision workflow. Researching on the internet, as I did a year ago, to try and improve your revision skills is an awesome first step, and something that many students don’t do! Also if you have any questions or want clarification on anything in this article, please feel free to reach out using the contact page and details here at geomorphus.com. Also please consider signing up to the newsletter below, to receive my latest blog posts by email!
For now, I would like to wish you the best of luck in your A Level Exams this coming summer. You’ve got this!
DISCLAIMER: The views and techniques expressed in this article are anecdotes on how I revised in preparation for my A Level Exams, and are mainly applicable to humanities subjects. I urge you to undertake further research before radically reforming the way you revise, given the high stakes involved at A Level. That being said, however, I hope that by sharing my process in this blog post I’ve prompted some thought about how to improve your revision process.